WARNING:
*This post is picture heavy, so fortify yourself with some coffee and snacks and settle in for the long haul.*
Ok, so......I've been promising this makeover post for quite awhile now, but one thing after another happened (or didn't happen) and it took much longer to complete than I thought, such is life I suppose. Part of this bathroom has been done for almost a year now, but I was hesitant to share it until it was complete. I'm happy to report that it's now complete! Yay!!! Like I warned you before though, it is a bit picture heavy, but I didn't figure you'd mind too awfully much since my posts have been so few and far between lately. It was quite challenging to get decent pictures of such a small room that doesn't get any natural light, but I did the best I could and we'll just live with it. Mmmm-kay? :)
So here goes.
I'm sharing the makeover of our second bathroom....the kiddos' bathroom, and when we have company it's also the guest bath.
When we moved in the trim was dark like the rest of the house and the walls were yellow peach orange....well, it just depended on what time of day it was really. Sometimes they looked yellow, sometimes peach, sometimes down right orange.....like the rest of the walls in the house were.
It had an oddly placed towel bar, brass/gold colored knobs (well actually it only had one doorknob, the one for the linen closet was missing and I went ahead and bought an oil rubbed bronze one that I found on clearance.) The tub is small, typical for a manufactured home, so we bought a curved shower rod for it right off the bat to give just a couple of more inches of room in there.
The floors had a very orange-y hue that matched the walls quite nicely really, but they drove me crazy. Especially the black "grout" lines and the off-centered way the tiles were laid (and not well, I might add. You could see the plywood subfloor in between some of the tiles!).
The mirror and vanity were pretty much builder grade I guess you could say. The counter top was a grayish blue, the boring sink was old and the finish was wearing off (no matter how much we cleaned it it still never looked clean), the light was brassy and boring, and it had a hand towel holder that was placed much too high. I guess I had already removed it when I took these pictures.
Scuzzy orange flat paint that was filthy.
SO much orange!!!!
BUT......
Some fresh coats of paint, crisp white trim, a new light, new flooring, a new vanity, a new shower curtain and towels, a little beadboard, and some decorative accents later and it was all MUCH improved!
I painted the room gray, Benjamin Moore's Rockport Gray at 50% to be exact. It took me FIVE tries to get the color right!! I also painted all the trim a fresh glossy, off-the-shelf white to brighten the place up even more.
One of the most fun things in the makeover was the shower curtain I made. You might remember that I shared that, and the tutorial for it, last year. It can be found {
here}. I had an idea of what I wanted in here, but the closest thing I could find was $40 and I didn't want to spend $40 on a shower curtain so I made my own....for $14 and loved it a WHOLE lot more than the original one I was thinking of buying. It's so unique and fun.

We changed out the vinyl floor tiles for something much less citrusy. These tiles weren't my first choice, but the ones I loved were much too expensive, I just couldn't afford them. So I went with these cheap ones from Lowes. They have quite a bit of beige in them and you wouldn't think that beige and gray would pair well together, but the walls have just enough "greige" tint to them, and the tiles have accents of gray as well as the beveled "grout" lines being gray and they work together just fine. Plus, I figure that down the road if I change my mind about the gray walls, the floors should be neutral enough to go well with something else. These tiles were inexpensive to begin with, but then I used an online promo code and got them even cheaper. I think I paid less than $30 for all of it. And notice that I had Hubby lay them even, with nice straight lines, not off-centered like the old tiles were. It pleases my eye so much better and just gives it a nice clean look.
On the left wall we added bead board that I painted white, new baseboards, and some chair rail to top it off. It added SO much character to the room!
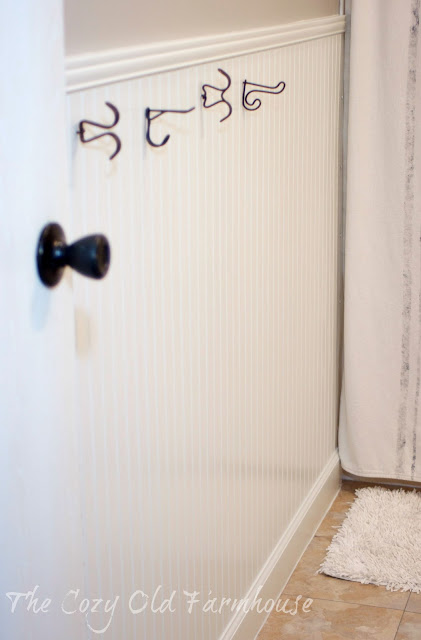
We also added vintage coat hooks to be used as towel holders. Notice that they're all different? I love to mix and match. :) They were a bit rusty so I coated them with a few coats of clear sealant spray to help keep them from rusting further with damp towels being placed on them, and also to keep the rust from rubbing off on said towels. I wanted hooks instead of towel bars so that it would be easier for the kids to hang their own towels up. We also placed them down a bit lower than you normally would so that the kids can reach them.
I found new towels that have stripes of "greige" that go really well with the rest of the room.
Above the bead board on this left wall I have a miniature gallery wall.
 |
| This one is a cell phone picture. The bathroom is so small I just couldn't zoom out far enough with my DSLR camera since I don't have a wide angle lens. So the quality of these next couple of pictures is a bit off, and the chair rail looks bent, but at least you get the idea. |
I hung bath time pictures of my kiddos from when they were babies, and then a more current photo of the two of them together. I added in pictures of each of their initials to add a cheery splash of red to the mix so that the room wouldn't be too monochromatic, plus y'all know I love me some red! (I guess I'll have to expand this gallery wall in about 5 more months. :D) I already had the two smaller frames, and the three wider frames I got for 50¢ each at a church rummage sale. The license plate in the middle is German, I found it at a vintage booth at a local quilt festival.
The other part of the gallery wall is this little "vintage" knock- off clock I made. You can read about how I turned a $4 Walmart clock into a "vintage" cutie and saved $56 while I was it!
Now let's look at the right side of the room.
Originally, there was a hand towel holder, the circle/ring kind, mounted above the sink on the wall, but it was too high and too hard for little ones to manage to put the towel back. So I installed a hook lower down on their level next to the linen closet instead. We also put in a new sink/vanity, but we'll get to that in a minute.
My 4 year old still can't reach the sink all the way and needs a stool to stand on. I found this cute little wooden one at a local antique/junk store for $8 and I love how the wood adds a spot of warmth to the room. If it was all gray and black and white it could be kind of cold feeling, but the wood adds a nice contrast that helps balance it out. A coat of clear wax helps protect it from moisture damage.

The walls and trim were painted, the beadboard and hooks were up, and the new shower curtain was up almost a year ago, but the room still had the old orange-ish vanity. I couldn't find what I wanted for a long time, plus we couldn't afford a new one for quite awhile. But then my little Etsy business took off and I saved up and finally found {
this} really cute vanity/sink combo. I showed it to Hubby and he approved so I ordered it. What neither of us thought about until we got it home was how the plumbing was situated. One of my non-negotiable requirements for a new vanity was that it
had to have drawers. This was the only one I could find that I liked, was the right size, and had drawers. But what we discovered was that the plumbing was actually situated on the right....in the way of the drawers. But thankfully handy Hubby was able to switch them around and make it work.

I spray painted the knobs to make them match the rest of the hardware in the room and it fits the space perfectly. I love that it's more narrow in depth than the old one. It gives a couple of inches more room and makes it feel just that much bigger in there. I love that the bead board insets match the bead board on the opposite wall, too.
Here's a full view of the sink area with the linen closet in the background. You can see I replaced the brass light and painted the mirror white as well.

There's a story behind this cute barn style light fixture. When we first moved back to Florida and were living in the rental house, the kids and I went yard saling one morning and came across a sale that had lots of things that were just my style. One thing she had was this light fixture, but she was asking more than I could afford and since we were still in the rental house and I wasn't positive I would actually need/use it I passed it up. Well, the nice lady invited us to visit her church and we ended up attending there permanently. So a year later when I was ready to re-do this bathroom I happened to think about that light fixture I had seen at her sale. I didn't figure there was much chance that she still had it, but I sent her a message to check just in case. I couldn't believe it when she texted back and said she did indeed still have it and that I could have it for free! (I had found a similar one, but just a single sconce, online for $143!!! ) I was so excited! I couldn't convince her to take any money for it, so I took her out to lunch instead. :)

Isn't this faucet the most adorable thing ever?!? I just love it to itsty bitsy squishy little pieces!!! And I got it for free, too! Well....basically for free. I make a little bit from Amazon each month or sometimes every other month and I had a few of the gift cards saved up and was able to order this for free. I just love the old fashioned style of it.
(The link for it will be at the end of the post if you're interested.)
We use this little miniature galvanized bucket to hold the kids toothbrushes and toothpaste.
I even spray painted the night light to match the room, lol!
 |
| Another cell phone picture. |
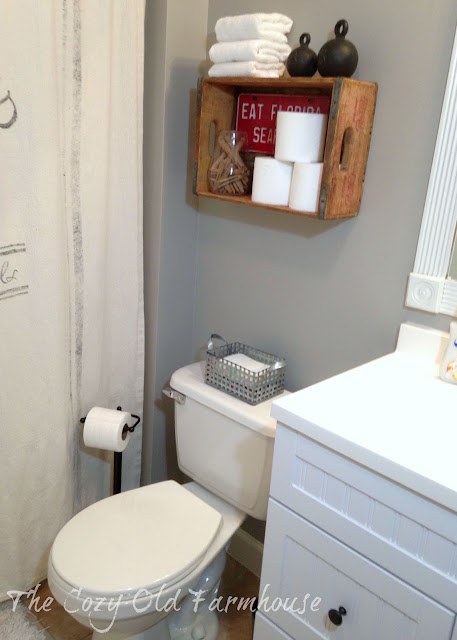
To the left of the sink is the toilet area.
I hung an old soda crate on the wall to hold some necessities as well as some decor items. Another spot of weathered wood further helps to warm up the room. On the top we keep extra hand towels folded up, and to the right of that are a couple of reproduction metal weights I found at Hobby Lobby a few years ago.
I got the license plate at a yard sale for 10¢ and it adds a quirky splash of red to this side of the room to balance out the red initials on the opposite wall. The crate also keeps some extra TP handy for guests who don't want to go rootin' through cupboards and closets searching for more when they're in desperate need. :) The other decorative piece of this display is a "jar" full of vintage clothespins. The "jar" is actually an antique street lamp cover that my grandpa gave me. It's open on both ends so we have to be careful when we move it to clean.

Also in the same area we find a toilet paper stand. There was no TP holder when we moved in and since the kids are small and couldn't reach across to the opposite wall, and placing it on the side of the vanity would be too squished, I opted for this stand to keep it within reach of the kids small arms. A little galvanized basket I got at a thrift store for 99¢ helps disguise the kids's bathroom wipes on the back of the toilet. And the trash can? Well it's a repurposed galvanized vintage flour bin. :)

Another cheap little makeover project for this room was the other light that is mounted on the ceiling. Previously it was brassy and gaudy looking with a textured glass round globe. Very 90's style. They are/were all throughout this home and slowly but surely we're updating them as we can. This makeover cost me a whopping 99¢! I had Hubby remove the metal part and I spray painted it Oil Rubbed Bronze that I already had. The globe part is actually from a ceiling fan I think and it cost me 99¢ at a thrift store. I like how it looks like a miniature vintage school style light now.
SO......that pretty much sums up everything that was done in here on this makeover project. Now let's take a look at some side by side before and after comparisons just for the fun of it.
I hope you've enjoyed this tour of our guest/kids' bathroom farmhouse style makeover, and thank you to my faithful readers that are still around even though I haven't been a very good blogger lately.
August is looking to be a busy month for us with my daughter's 8th birthday party coming up soon, swimming trips to the nearby springs, visits to the big city 45 minutes away for midwife appts, and towards the end of the month an ultrasound to find out if this little person growing inside me is a boy or a girl! I can't wait!! :D
I hope you're having a fantastic summer!

Sharing over at:
(affiliate link)